 50 min read
 Intermediate Level
 Lesson 28 of 35
Lesson Objective
This lesson covers the complete podcast production workflow from initial recording setup through editing, processing, and publishing. Podcast production applies many of the same audio engineering principles covered in previous lessons but with a focus on speech intelligibility, efficient editing workflows, and the specific technical requirements of podcast distribution platforms. By the end of this lesson, you will be able to produce professional-quality podcast episodes from start to finish.
What You Will Learn
- Microphone and equipment selection for podcast recording
- Setting up a solo recording environment for optimal sound quality
- Multi-person in-room recording setups
- Remote interview recording using platforms like Riverside and Zencastr
- Speech editing: removing filler words, long pauses, and mistakes
- The speech processing chain: EQ, compression, de-essing, and noise reduction
- Loudness standards and technical requirements for podcast platforms
Required Knowledge or Tools
Podcast production benefits from a general understanding of audio recording and editing. You do not need advanced mixing skills, but familiarity with your DAW's basic editing tools and audio processing plugins will help.
- Completion of Lessons 4 (Recording), 6 (Editing), 7 (EQ), and 8 (Compression)
- A dynamic or condenser microphone suitable for speech recording
- An audio interface or USB microphone
- A DAW or dedicated podcast editing software (Audacity, Adobe Audition, Hindenburg, Descript)
- Headphones for monitoring during recording and editing
Core Concept Explanation
Podcast production differs from music production in several important ways. The primary goal is speech intelligibility — every word must be clearly audible and easy to understand. Dynamic range is less important than consistency; listeners often consume podcasts in noisy environments like cars and gyms where quiet passages are inaudible. The editing workflow focuses on removing errors and improving pacing rather than on musical timing and arrangement.
Microphone Selection for Podcasting
The microphone is the most important piece of equipment in a podcast setup. Dynamic microphones like the Shure SM7B, Electro-Voice RE20, and Rode PodMic are popular choices for podcasting because they reject background noise and room reflections more effectively than condenser microphones. They require close-mic technique (speaking 2–6 inches from the capsule) but reward this with a warm, intimate sound that works well for speech.
Condenser microphones like the Audio-Technica AT2020 and Rode NT1 offer greater detail and sensitivity but pick up more room noise and require a treated recording environment. They work well in acoustically treated spaces but can sound harsh and roomy in untreated rooms.
USB microphones like the Blue Yeti, Rode NT-USB, and Shure MV7 connect directly to a computer without an audio interface, making them convenient for beginners. They offer good quality for the price but provide less flexibility than XLR microphones connected through an audio interface.
Room Treatment Matters: The acoustic quality of your recording environment has a greater impact on podcast audio quality than the microphone you use. A modest microphone in a well-treated room will sound better than an expensive microphone in a reverberant, noisy space. Treat your recording space before investing in expensive equipment.
Solo and Multi-Person Recording Setups
For solo recording, position the microphone on a boom arm or stand at mouth height, 3–6 inches from your lips. Use a pop filter to reduce plosive sounds (the "p" and "b" sounds that cause low-frequency thumps). Record in the quietest, most acoustically treated space available. Closets filled with clothing are surprisingly effective recording environments because the soft materials absorb reflections.
For multi-person in-room recording, each participant should have their own microphone and record to a separate track. This allows you to process each voice independently and edit individual tracks without affecting others. Position microphones to minimize bleed between participants — cardioid polar patterns reject sound from the sides and rear, helping to isolate each voice.
Remote Interview Recording
Recording remote interviews presents unique challenges. Phone calls and standard video conferencing tools like Zoom compress audio heavily, resulting in low-quality recordings. Dedicated podcast recording platforms solve this problem by recording each participant locally at full quality and uploading the recordings after the session.
Riverside.fm records each participant's audio and video locally at up to 48 kHz / 32-bit float, then uploads the files to the cloud. Zencastr offers similar functionality with a focus on audio-only recording. SquadCast is another popular option. These platforms eliminate the quality degradation of internet-based audio transmission and give you separate, high-quality tracks for each participant.
When recording remote interviews, always ask guests to use headphones to prevent their microphone from picking up your voice from their speakers (double-ender bleed). Ask them to record in a quiet environment and to use the best microphone available to them.
Speech Editing Workflow
Editing a podcast episode involves removing content that should not be in the final episode: long pauses, filler words ("um," "uh," "like"), false starts, mistakes, and off-topic tangents. The goal is to improve the pacing and clarity of the conversation without making it sound unnaturally edited.
Start by listening through the entire recording and marking sections to remove. Most DAWs allow you to add markers or regions during playback. Then work through the recording systematically, removing marked sections and smoothing the edits. Leave short pauses between sentences — completely removing all silence makes speech sound rushed and unnatural. Aim for pauses of 0.3–0.5 seconds between sentences.
AI-powered editing tools like Descript allow you to edit audio by editing a text transcript, making the process significantly faster. You can delete words from the transcript and the corresponding audio is automatically removed. This approach is particularly efficient for removing filler words throughout a long recording.
The Speech Processing Chain
Processing speech for podcasting follows a specific chain designed to maximize intelligibility and consistency. The typical order is: noise reduction, high-pass filter, EQ, de-esser, compression, and limiting.
Noise reduction removes consistent background noise like HVAC hum, computer fan noise, and room tone. Tools like iZotope RX, Adobe Audition's Noise Reduction, and Audacity's Noise Reduction effect analyze a sample of the noise and subtract it from the signal.
High-pass filter removes low-frequency rumble and handling noise below 80–100 Hz. Speech contains no useful information below this range, and removing it cleans up the low end significantly.
EQ shapes the tonal character of the voice. A gentle boost around 2–4 kHz adds presence and intelligibility. A cut around 300–500 Hz reduces muddiness. A boost around 8–12 kHz adds air and clarity. Keep EQ adjustments subtle — the goal is to enhance the natural voice, not to change it dramatically.
De-essing reduces harsh sibilance — the "s" and "sh" sounds that can be piercing and fatiguing. A de-esser is a frequency-selective compressor that targets the 5–10 kHz range where sibilance lives.
Compression controls the dynamic range of the voice, bringing up quiet passages and controlling loud ones. Use a moderate ratio (3:1 to 4:1) with a medium attack and release. Aim for 4–8 dB of gain reduction on the loudest passages.
Limiting prevents the signal from exceeding 0 dBFS and ensures a consistent output level. Set the limiter ceiling to -1 dBTP (true peak) to prevent inter-sample peaks that can cause distortion on some playback systems.
Loudness Standard: Most podcast platforms recommend a target loudness of -16 LUFS (Loudness Units relative to Full Scale) for stereo podcasts and -19 LUFS for mono. Spotify recommends -14 LUFS. Use a loudness meter plugin to measure and match your episode to the target loudness before exporting.
Visual Explanation
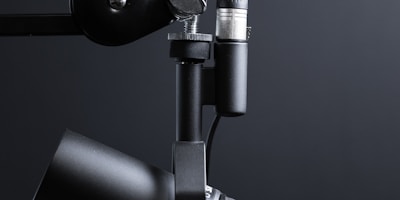
A typical podcast recording setup includes a dynamic microphone on a boom arm, headphones for monitoring, an audio interface, and acoustic treatment to minimize room reflections and background noise.
The physical setup of a podcast recording environment significantly affects the quality of the final audio. Soft surfaces (curtains, carpets, acoustic panels, bookshelves filled with books) absorb reflections and reduce reverberation. Hard surfaces (bare walls, windows, desks) reflect sound and create a roomy, echoey quality. The ideal recording space is small, well-furnished, and free from external noise sources.
Why This Lesson Matters
Podcasting has grown into one of the most significant forms of audio media, with hundreds of millions of listeners worldwide. The technical quality of a podcast directly affects listener retention — poor audio quality is consistently cited as the primary reason listeners stop listening to a podcast. Understanding how to produce professional-quality podcast audio gives your content a competitive advantage and demonstrates respect for your audience's listening experience.
The skills covered in this lesson — recording speech, editing for clarity and pacing, processing for intelligibility, and meeting platform technical requirements — are also directly applicable to audiobook production, voiceover work, corporate video narration, and any other context where spoken-word audio needs to be produced professionally.
Consistency Is Key: Listeners notice inconsistencies in audio quality between episodes more than they notice absolute quality. Establish a consistent recording setup, processing chain, and loudness target and apply them to every episode. Consistency builds trust and professionalism, even if the absolute quality is not perfect.
Step-by-Step Tutorial
Follow this complete workflow to produce a podcast episode:
- Set Up Your Recording Environment: Choose the quietest, most acoustically treated space available. Position your microphone on a boom arm at mouth height, 3–5 inches from your lips. Set your audio interface gain so that your voice peaks around -12 to -6 dBFS during normal speech. Record a short test and listen back to check for background noise, room reflections, and level issues before starting the main recording.
- Record the Episode: Record the full episode in one or more takes. Do not stop to fix mistakes during recording — simply pause, clap your hands once (to create a visible spike in the waveform for easy location during editing), and repeat the section. Keep the recording session moving and fix mistakes in editing. Record room tone (30 seconds of silence in the recording environment) at the end of the session for use in noise reduction.
- Edit the Content: Import the recording into your editing software. Listen through the entire episode and mark sections to remove: long pauses, filler words, mistakes, and off-topic tangents. Work through the recording systematically, removing marked sections. Use the room tone recording to fill any gaps where the background noise changes abruptly after an edit.
- Apply Noise Reduction: If the recording has consistent background noise, apply noise reduction using the room tone sample as a noise profile. Apply conservatively — aggressive noise reduction creates metallic, artifact-laden audio. Aim to reduce the noise floor by 6–10 dB rather than eliminating it completely.
- Process the Voice: Apply the speech processing chain in order: high-pass filter at 80–100 Hz, EQ for presence and clarity, de-esser for sibilance control, compression for dynamic control (3:1 ratio, 4–8 dB gain reduction), and a limiter with a ceiling of -1 dBTP. Compare the processed and unprocessed voice to ensure the processing is improving intelligibility without sounding over-processed.
- Set Loudness and Export: Measure the integrated loudness of the processed episode using a loudness meter. Adjust the output level to match the target loudness for your primary distribution platform (-16 LUFS for most platforms, -14 LUFS for Spotify). Export as a stereo MP3 at 128 kbps (acceptable quality) or 192 kbps (higher quality) for distribution, or as a WAV file if your hosting platform handles encoding.
Common Mistakes and Misunderstandings
Mistake 1: Recording in a reverberant environment. Room reflections are the most common cause of poor podcast audio quality. A recording that sounds echoey or roomy cannot be fully corrected in post-production. Always treat your recording environment before recording, even if it means recording in a closet or under a blanket.
Mistake 2: Setting the recording level too high. Clipping during recording creates permanent distortion that cannot be repaired. Set your gain conservatively — peaks at -12 to -6 dBFS leave plenty of headroom for unexpected loud moments. You can always increase the level in post-production, but you cannot fix clipping.
Mistake 3: Over-editing to remove every pause and filler word. Completely removing all natural speech patterns makes the audio sound robotic and unnatural. Leave some natural pauses and occasional filler words — they are part of natural speech and make the conversation feel authentic.
Mistake 4: Ignoring loudness normalization. Podcast platforms normalize episode loudness to a target level. If your episode is too quiet, the platform will boost it, which raises the noise floor. If it is too loud, the platform will reduce it. Matching the platform's target loudness ensures your episode sounds as intended.
Mistake 5: Using Zoom or Skype for remote interview recording. These platforms compress audio heavily and do not provide separate tracks for each participant. Use dedicated podcast recording platforms like Riverside, Zencastr, or SquadCast for remote interviews to ensure high-quality, separate recordings from each participant.
Practical Example or Scenario
A journalist is launching a weekly interview podcast. She has a Shure SM7B microphone connected to a Focusrite Scarlett 2i2 audio interface, and she records in a home office with bookshelves and curtains that provide reasonable acoustic treatment.
For her first remote interview, she uses Riverside.fm to record both herself and her guest locally. The guest records on a laptop with a Blue Yeti USB microphone in a home office. After the 45-minute interview, Riverside uploads two separate high-quality audio files — one for each participant.
She imports both tracks into Adobe Audition. She listens through the interview and marks sections to remove: a two-minute tangent that went off-topic, several long pauses, and a section where the guest was interrupted by a phone call. She edits these out and smooths the transitions.
She applies noise reduction to the guest's track, which has some HVAC noise in the background. She processes both tracks with the speech processing chain: high-pass filter, EQ, de-esser, and compression. She adjusts the levels so both voices are at similar loudness levels.
She adds an intro music bed, a brief intro narration, and an outro, then measures the integrated loudness of the complete episode. It reads -18 LUFS, so she raises the output level by 2 dB to reach -16 LUFS. She exports as a 192 kbps MP3 and uploads to her podcast hosting platform. The finished episode sounds clean, professional, and consistent with her previous episodes.
Lesson Summary
Podcast production applies audio engineering principles to spoken-word content with a focus on speech intelligibility, consistent quality, and efficient editing workflows. Microphone selection and room acoustics are the most important factors in recording quality. Dynamic microphones work well in untreated spaces; condenser microphones require acoustic treatment.
Remote interviews should be recorded using dedicated platforms like Riverside or Zencastr that capture local recordings from each participant. Speech editing removes errors and improves pacing without making the conversation sound unnatural. The speech processing chain — noise reduction, high-pass filter, EQ, de-esser, compression, and limiting — maximizes intelligibility and consistency.
Target a loudness of -16 LUFS for most platforms and export at appropriate quality settings. The next lesson covers Music for Video and Sync, exploring how to compose, license, and deliver music for film, television, and other visual media.